Calling all artists, non-artists, and the artisti-curious. Get ready to channel some literary Bob Ross vibes, because it's time to learn how to transform your favorite book cover into a lovely piece of art for your home.
Important note to keep in mind throughout this tutorial: there is no wrong way to create. If any part of this tutorial doesn't work for you, change it up, go your own way, or throw some glitter on there. As long as you're having fun, there's no such thing as a wrong choice.

A lot of the materials you'll need will depend on what medium you're interested in using. I used canvas and paint markers for this tutorial, but you can switch those out with any other art supplies you want to use or have on hand. You will need to have some version of the following materials though:
- A book cover. You can either remove the cover from a book or print a copy from online. If you print a copy, look for the largest size you can find.
- A pencil.
- A ruler.
- Something to draw/paint/color on (I use a 20 X 16 inch canvas in this tutorial).
- Something to draw/paint/color with (I use acrylic paint markers in this tutorial).

Step 1: Choose your cover
The first thing you'll need to do in this project is choose a book cover. Although there are no wrong choices, there are certain types of covers I'd recommend for your first time. Unless you're an artist (which I am most certainly not), it will be a lot easier to use book covers that doesn't have a lot shading. For example:
These book covers are flat. They have clean lines and discrete blocks of color.


These book covers have a lot of shading. One segment of art flows into another, and there are very few clear lines of demarcation.


Although it's certainly not impossible to successfully use shaded art with this tutorial,

This gorgeous book cover was created by David Mann. If you're looking for book cover inspiration, check out his designs. Remember though, book cover artwork is intellectual property. Please use this tutorial for personal use only.
Step 2: Prepare your cover
Either print out a copy of your chosen book cover or remove the book jacket. Then, use a ruler to draw a grid over the entirety of your image. The lines of your grid should be visible, and the squares should be large enough that you can see details inside of them.
The grid squares I used in this tutorial are .5 X .5 inch. If the artwork you chose is less detailed than mine, you can make your squares larger, although I would not go above one inch in size. If your artwork has a lot of different colors and you're having difficulty seeing the lines in some places, you may have to switch to a black and white print out (which is what I did) or alternate the color of your grid so it stands out across the whole image.
Once your grid is complete, consider trimming the edges of your book cover or print out. This is not a required step, but it does make it easier to see what you're working with.
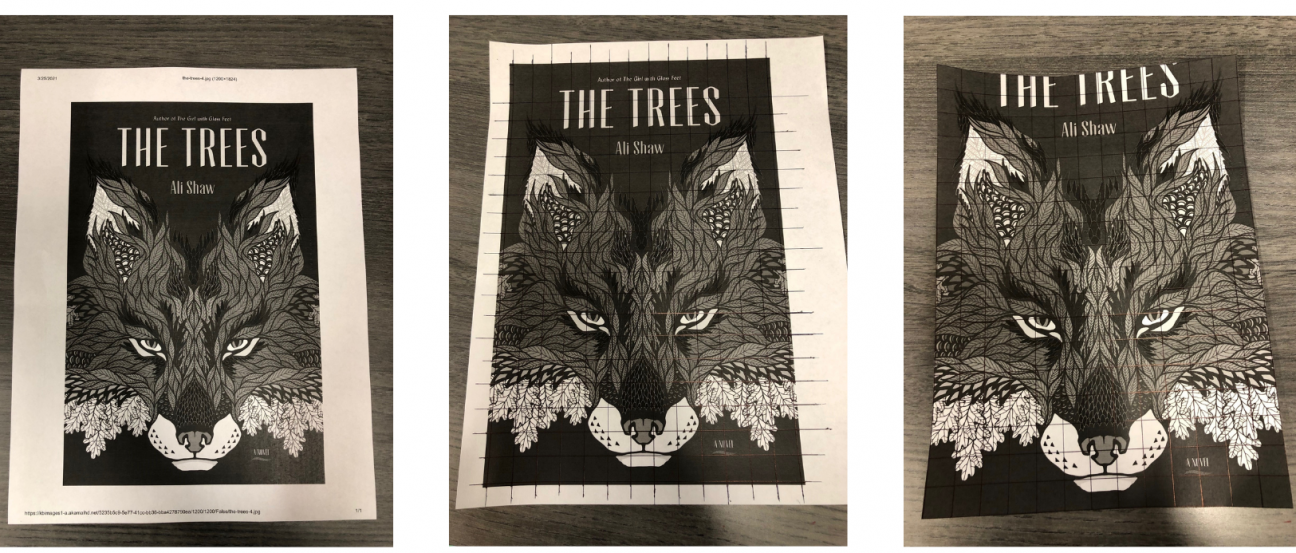
Note: You can chose to include or exclude the book's title and author in your artwork. For this tutorial I chose to exclude all text.
Step 3: Prepare your surface
Step 3 is hardest, and that's because it involves math.
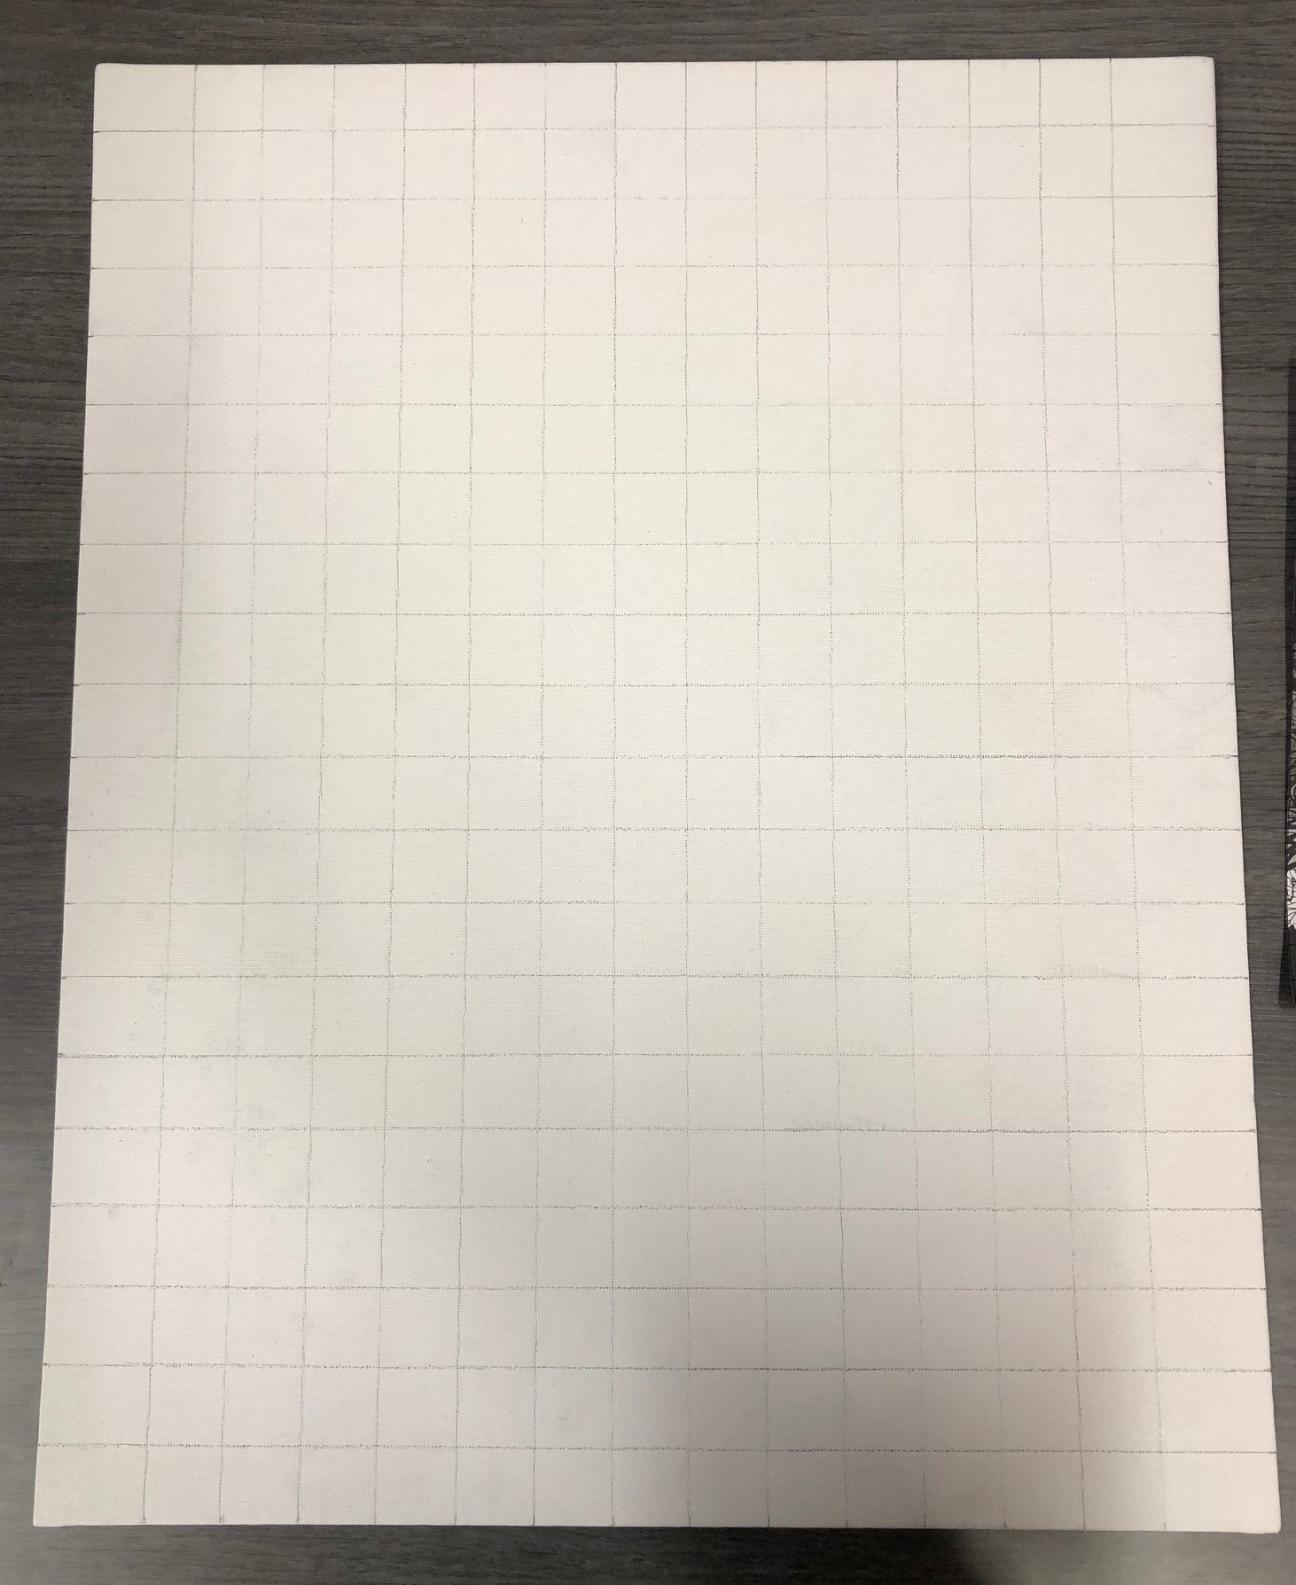
First, count the number of squares in the grid over your book cover. Mine was 13 X 18. Next, draw a grid with the exact same number of squares -IN PENCIL- onto whatever surface you're planning to draw/paint/color on. Unless your surface is the exact same size as your book cover, you're going to have to figure out what size your expanded grid squares need to be.
The surface I used in this tutorial was 16 X 20 inches and I knew I needed to fit a 13 X 18 grid onto it. Instead of trying to fit 18 squares exactly into a 20 inch space (I wasn't interested in measuring that many 1.1111 X 1.1111 inch squares), I decided to simplify matters and make each square 1 X 1 inch. That left a border of 1 inch on the top and bottom, and 1.5 inches on the sides.
Step 4: Get to work
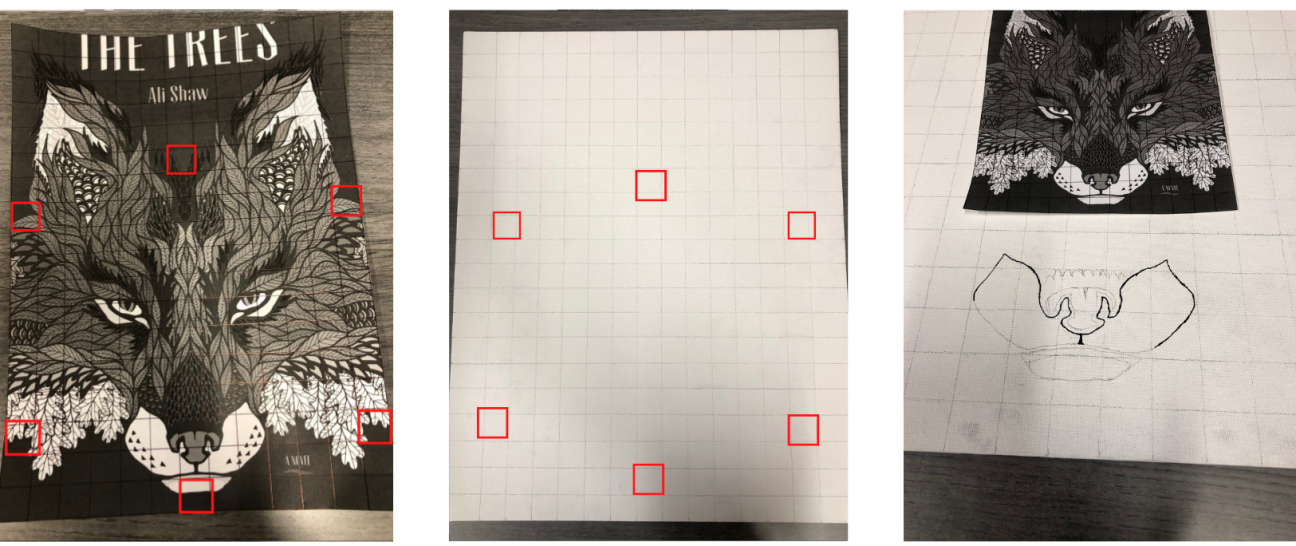
It's finally time to start working on your art. To begin, you're going to have to choose your 'starting square'. If this is your first time, I recommend choosing a square that sits at the edge of the image on your book cover, but isn't all the way in the corner of your grid. While it ultimately doesn't matter where you start, it is easier to keep your artwork centered if you begin in the middle, rather than try to work your way across your surface. I've highlighted some good 'starting squares' for my book cover in red in the images below.
Once you've chosen the starting square on your book cover, determine which square it corresponds to on your surface grid (also highlighted in red below). For my artwork, I chose to start with the bottom center square - the middle of the fox's chin.
Then, IN PENCIL, begin to copy what you see on your book cover onto your surface. Don't worry about mistakes, that's why we're starting in pencil. If something doesn't look quite right, just erase a few lines and try again.
Once you've covered a few squares, you have a choice in front of you. You can either copy the entire image in pencil and then go back over your outline in paint/markers/colored pencil, or you can choose to color in as you go. Because my pencil lines were starting to smudge, I chose to paint as I went along (as you can start to see in the third image below).
Step 5: Establish some landmarks
As you work,
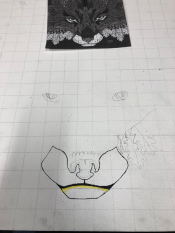
After working a bit on the fox's chin and muzzle, for example, I went ahead and drew its eyes so I could better visualize the space I was working with (pictured right). I have to say, the pencil eyes made the poor dude looked pretty tired for a while before I worked my way back up to them with the paint. I feel your pain, Mr. Fox.
Step 6: Just keep swimming
Now that you've gotten started, the only thing left to do is finish (I know - easier said than done). Keep working on your outline, making sure the squares on your surface and the squares on your book cover stay properly aligned. Most importantly, don't worry about any mistakes you might make along the way. You can either leave them in (Bob Ross vibes: no such thing as mistakes - only happy accidents), or invest in a bottle of white out and do some touch ups as you go.
For this tutorial I ended up going the white out route (I used A LOT of it). You might be able to spot some places I backtracked in the progress shots below.
Depending on how detailed your book cover is and how large your surface, this project can take a while. Just keep plugging away, and slowly you'll start to see your artwork come together.
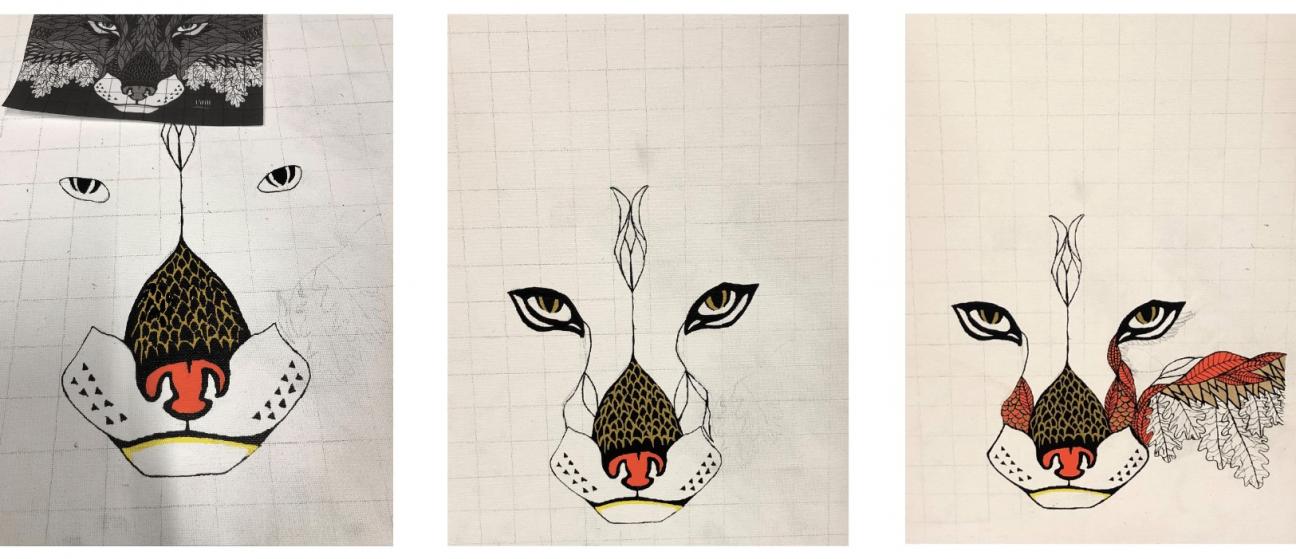
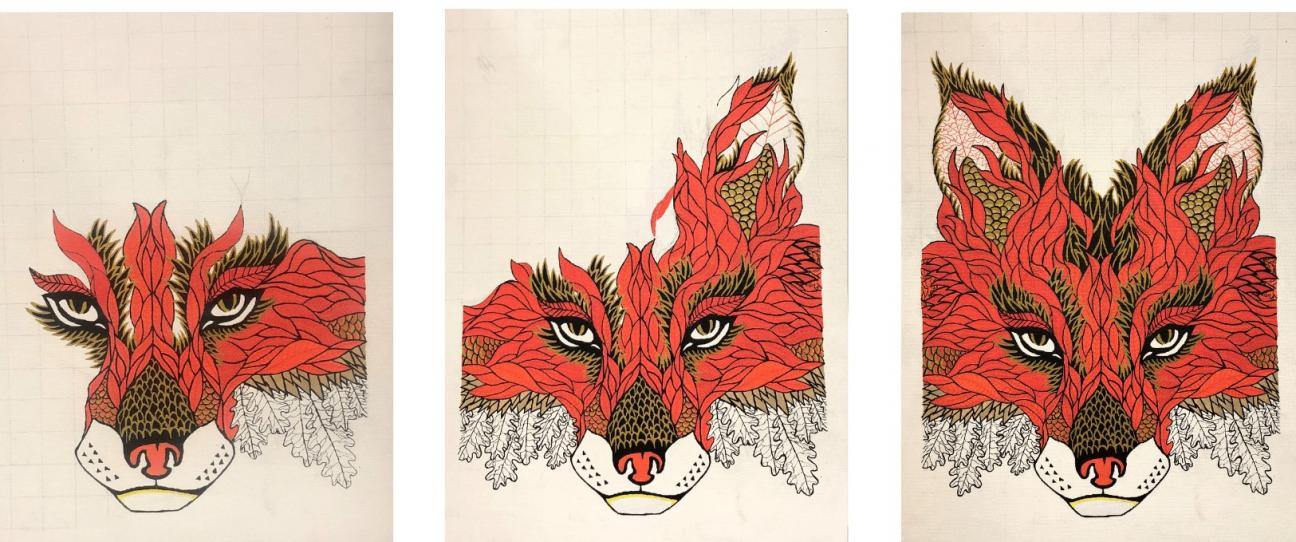
Step 7: Finishing Touches
Once you finish creating your artwork, it's time for some finishing touches. Before you do anything else, go ahead and carefully erase any leftover grid marks or pencil smudges on your canvas (if there are any).
If your image covers the entirety of your canvas, congratulations! You're done! Throw your new artwork into a frame and hang it in a place of pride. If, like me, your image doesn't quite reach the edges of the canvas, it's time to decide if you want to add a border or color in the background. Although I personally considered painting the remainder of the canvas black (as it is on the book cover), I ultimately decided that in this case less is more and left it the way it was. It was a decision based entirely on aesthetics and not at all because my hand hurt from all the coloring.

If you enjoyed this tutorial keep checking our home page for more craft projects, or use your library card to sign in to our craft eSource Creativebug!